I am excited today to share with you about the Test flow control feature in useMango. The feature is currently under development and is almost ready, however, I can’t wait to give you insight into what’s coming your way soon.
As of today, a useMango test is a sequence of steps being executed one after another. However, there are instances in which you need to decide to execute a specific set of steps based on the result of a previous step. Let’s understand this by example.
Almost every web application today has a feature to store user login information, with this feature, the user need not have to re-login every time he opens a new tab. While automating a workflow for such a web application, we need a way to perform an if-else type of control flow, you only need to log-in when the uses session gets expired. Achieving this in useMango was only possible with a scripted component, the user would have to code the above-mentioned if-else logic in the scripted component. this defeats the whole purpose of codeless automation.
Introducing the Test Flow Control feature, which allows selective execution of steps. This is achieved by using a new construct called Junction. A Junction allows the user to define two step-sequences (Left Branch and Right Branch) and selectively run either of the sequences. Let’s dive in more by authoring a test that will need selective step execution.
In this article I will use step sequence phrase quite often, a step sequence is nothing but a set of steps that get executed in the given order. You can envision the older useMango test as a single step-sequence. However, with the Junction construct, a test can have multiple step sequences.
We shall now automate a test case to test if the user’s cart shows an empty cart icon. We shall use the useMango practice website https://practise.usemango.co.uk/ for our test.
New-look Test Designer
To allow users the power to do selective execution of steps, we had to redesign the Test Designer from scratch. We now think of a test, not as a single sequence of steps but a graph with multiple sequences of steps
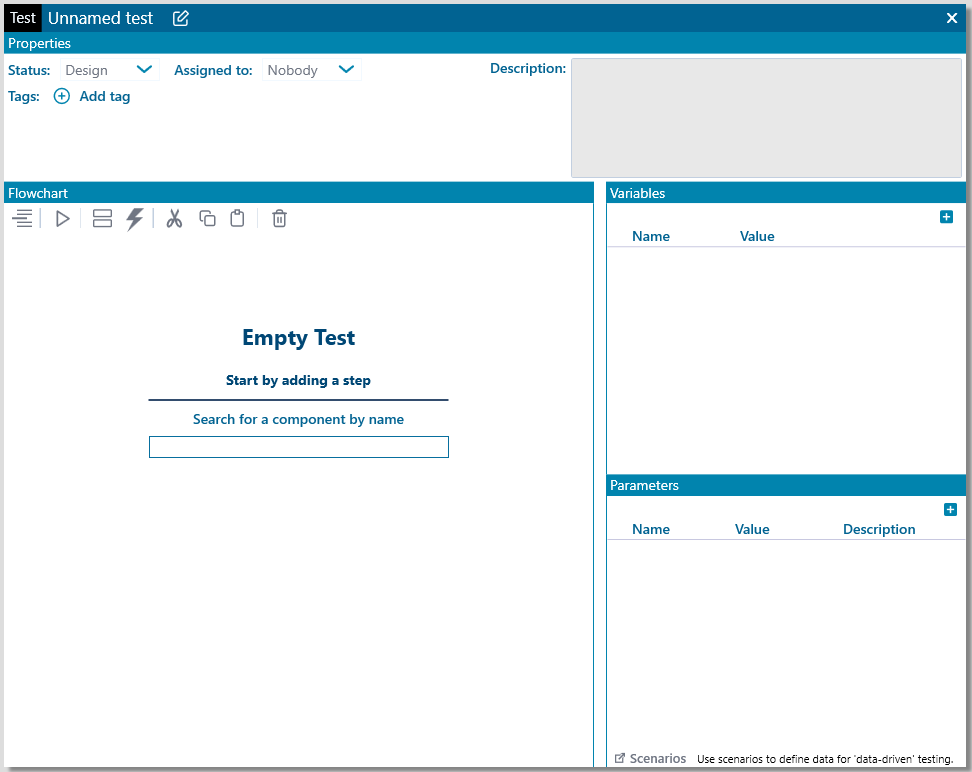
Let’s add a new test and name it Test flow control. The test designer will guide you that the test is empty and allow you to add the first step.
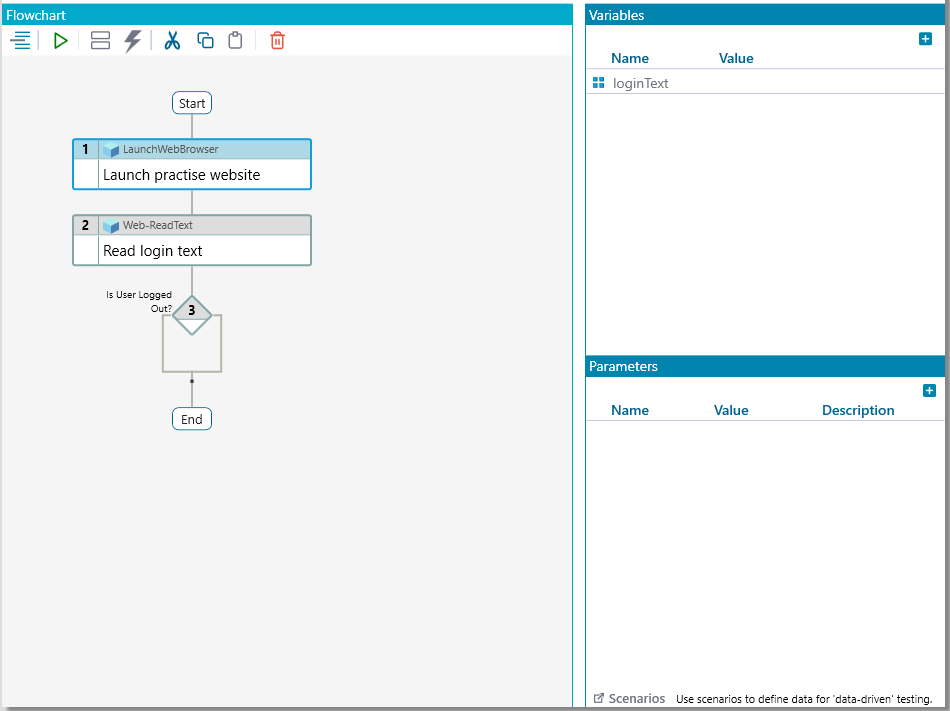
Test Map
The test designer has been revamped to have a control flow graph for test steps, we call this a Test Map when you select a step, the step details are listed in the right-side pane.
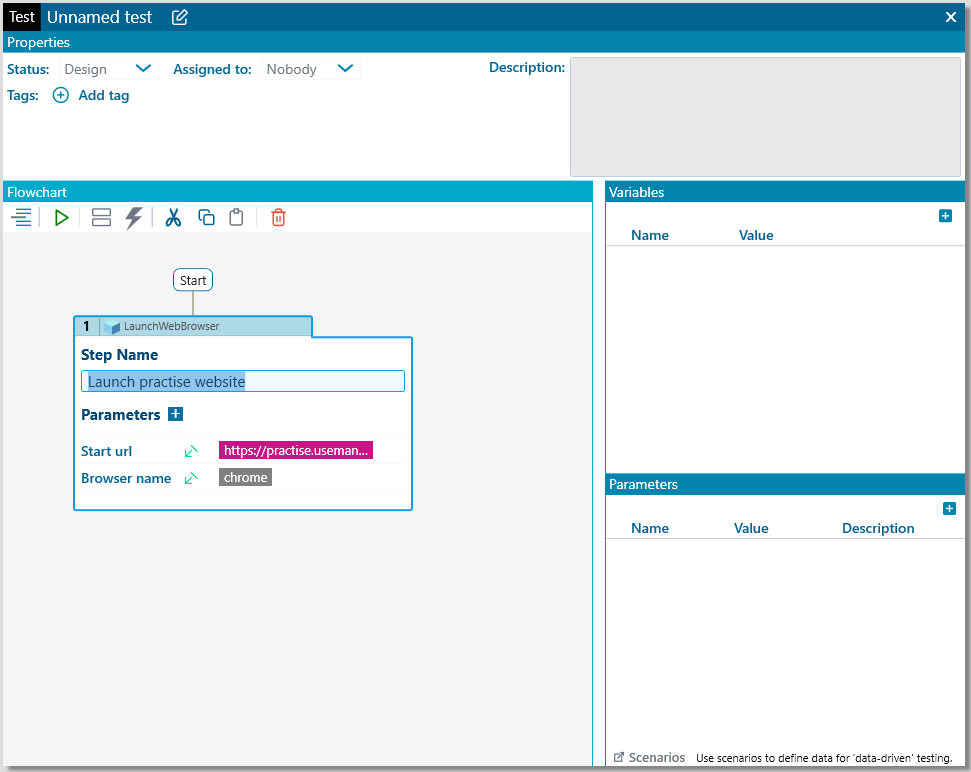
Let’s add a new step using Component LaunchWebBrowser to launch the practice website.
Test Map toolbar
The toolbar for the test map has four new buttons to allow user to add a Step or Junction to the test map. In this blog article, I will use Node as a shorthand to mean both a Step and a Junction
When a Step is selected in the Test Map, only the toolbar buttons allowing you to add nodes on the top or below are enabled.
When a Junction is selected the toolbar buttons to add on the left and right branch are also enabled.
Why do we need the Junction construct here?
We now want to check if the user is already logged in. if he is logged in we want to jump directly to the step that lists the items in the cart. However, if the user is not logged in, we want to execute steps to get the user logged-in first and then execute the step to list items in the cart.
This is where Junction comes to our rescue. It allows us to execute a sequence of steps based on a certain condition. Let’s see how to do it.
Decision Variable
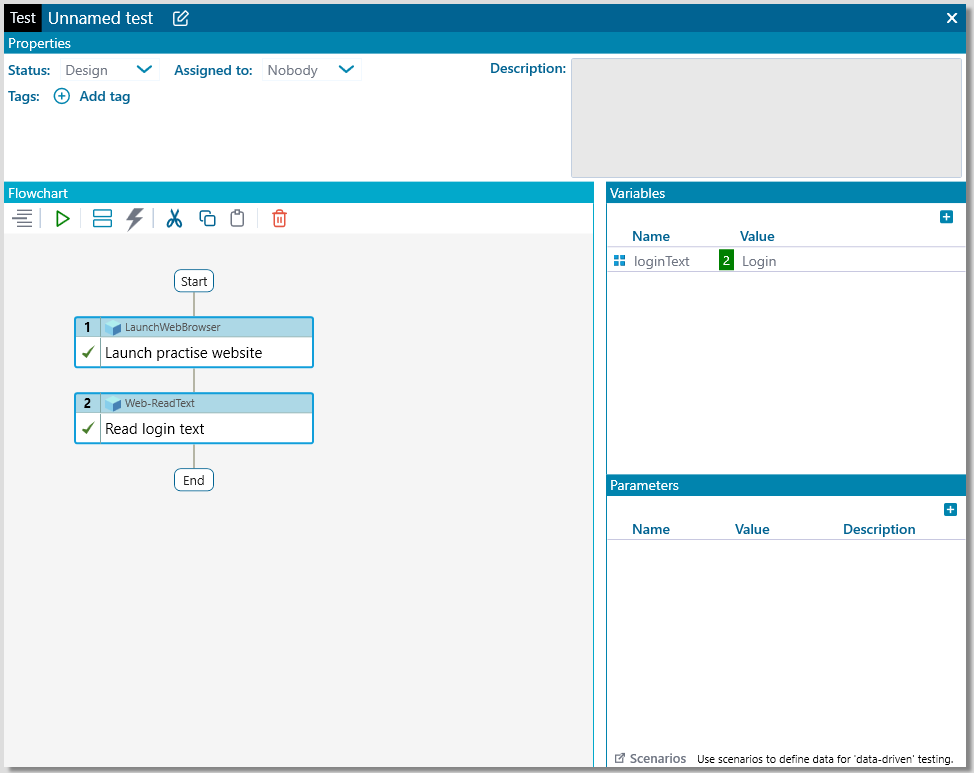
Junction allows us to execute certain steps based on a value in the decision variable. Let’s add a test variable with the name loginText.
The website shows a link with the text Login when the user is logged-out, otherwise, a link with the text Logout is shown. Let’s populate this text in the loginText variable.
Click on the insert below toolbar item and select Insert step to launch the insert step popup. Search for the Web-ReadText component and add a step to read the login text into the loginText variable.
Decide whether we should login using the Junction
Now that we have the decision variable populated, let’s add a Junction and assign the ‘loginText’ as the decision variable. The Junction will now use the value of this variable to decide which step sequence to execute (Left Branch or Right branch)
Decide when to branch left
Now that we have the decision variable we should decide when to branch left. let’s branch left when the user is logged out (Variable loginText has the value Login).
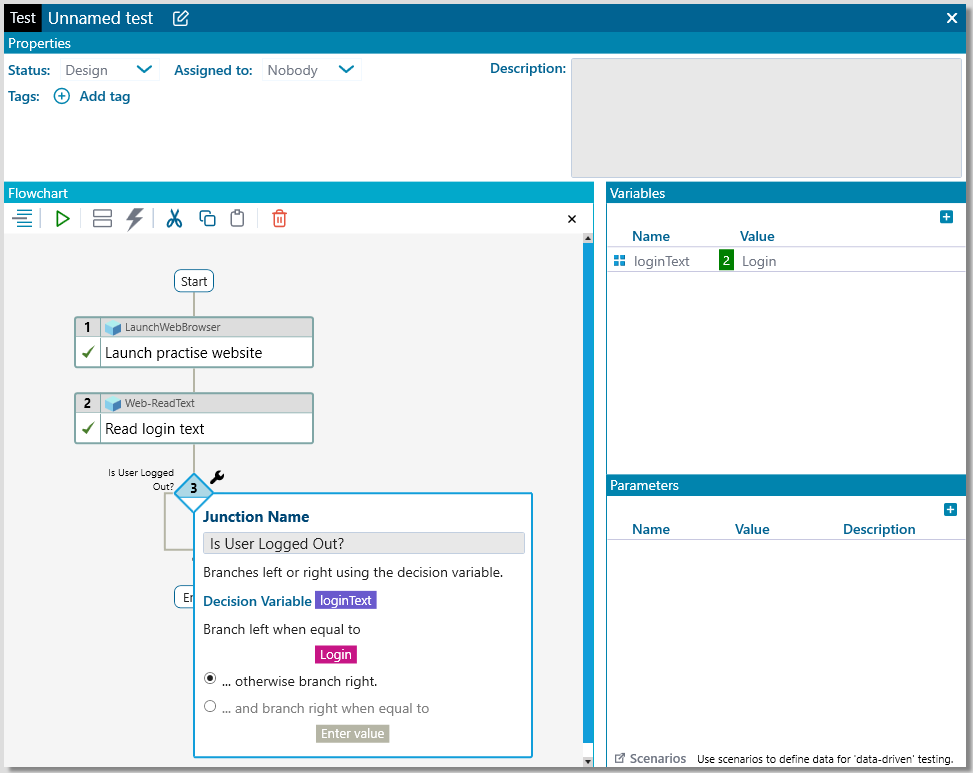
Note: Junction does a case-sensitive comparison.
Decide when to branch right
We want the right branch to be executed only when the value of the variable is Logout. select the Specific value checkbox and specify the value to match for branching right as Logout.
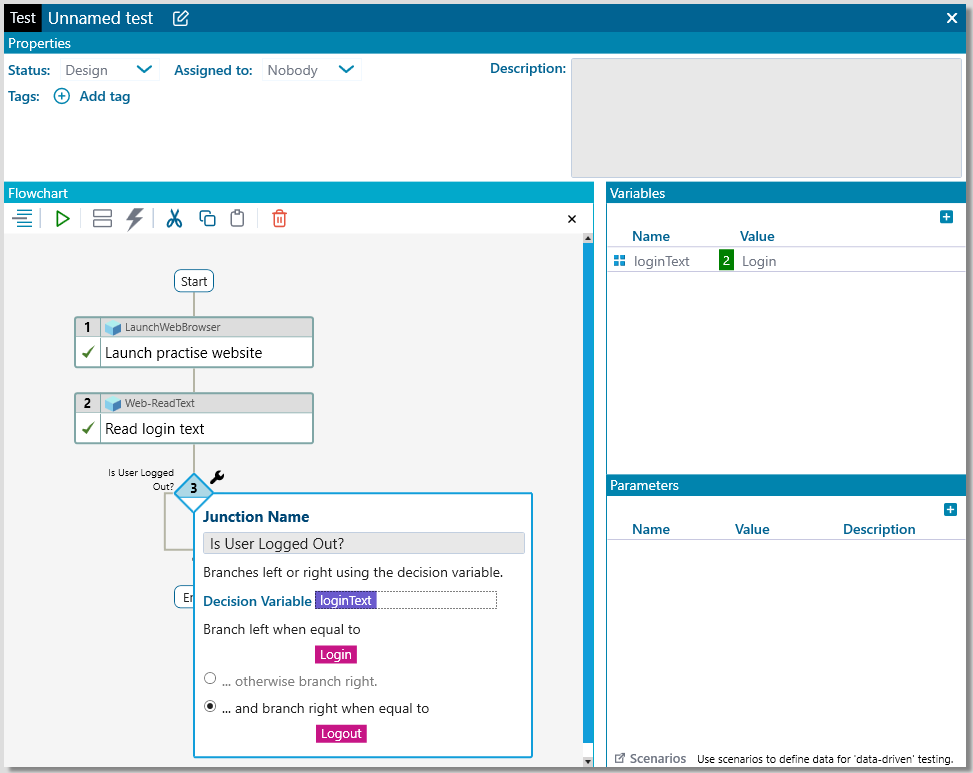
In our case, we could even leave the default option of Any other value for branching right, which means the right branch will be executed if the variable value is not Login
Add steps to login the user in the left branch
The left branch will be executed when the user is not logged-in. Now let’s add steps to the left branch to perform user login.
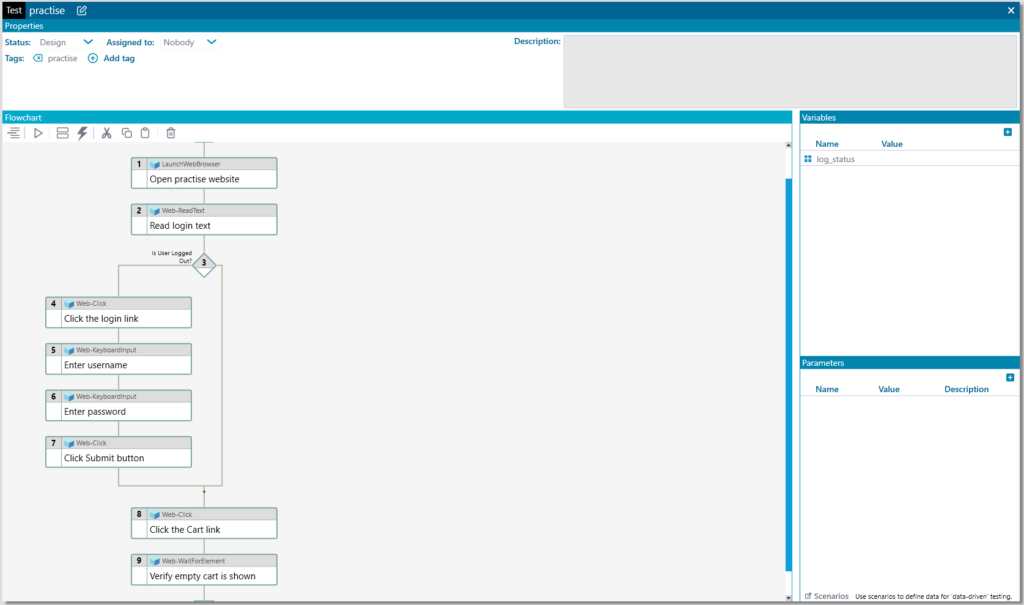
For brevity, I have added steps 4-7 to achieve the user login process in the practise website.
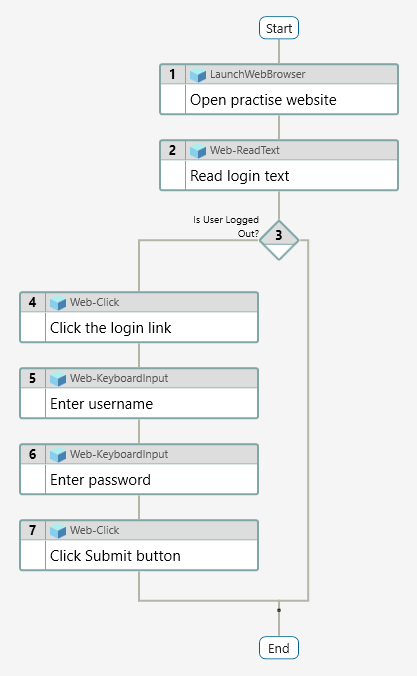
You must have noticed that we haven’t added any steps in the right branch. That’s because when user is already logged in we don’t need to perform any action. When the right branch is selected by the Junction, the control will directly flow to the step below the Junction as the right branch has an empty step sequence.
Add step to launch the cart page and verify if the empty cart icon is shown
Now that we have finished with the login workflow, we can add steps after the Junction to launch the cart page.
To add step below the Junction, select the Junction and click the Insert below button on the toolbar of Test Map.
Let’s add a step using component Web-click to click on the cart link. After this add a verification step using Web-WaitForWebElement component to verify if an empty cart image is shown. Now the final test will look as below.
Select and run multiple steps in test designer
To select multiple steps, click and drag over the steps that you plan to select (drag-select), note that when you drag over a Junction, all the steps in both the branches of the Junction are selected.
Now click the Execute step button to execute the selected steps.
Summary
The Junction construct of usemango adds a new dimension to the type of tests you can author with useMango. This was a long-awaited feature and will simplify automating test cases that need selective execution of test steps. This also shows you a glimpse into the future product vision for useMango, In the future, you can expect more such test flow control related constructs.
Do note that the final version of the feature may be different as the feature is currently under development.
If you want to learn more about useMango and how it can help your organisation deliver top quality test automation sign up for our free trial today!